Creating users - Buying, Upgrading, and Swapping licences [Article 01-0106]
Creating new users for your account ...
- Log In to your account
- Tap the Admin tab in the main header bar and select ‘Account Management’
- You come directly to the ‘Licences and Payment’ page
- Tap the '+' button at the top left hand corner of the Licences and Payment table
- Fill in the details at the 'Create a new user for your account' screen - this is where you set a password for the new user
- Tap 'Create User'
- Tap 'OK' at the 'Success - User Created' screen: there is a link here to set the new user's roles - the default is that they have only the basic ‘user’ role to start with
- The user appears in the Licences and Payment table in a dark grey row: none of their radio buttons is checked, indicating that they have no licences yet
Giving licences to new users
- To give a new user a licence, select the product in question - i.e. 'Installation', 'PAT', 'Asset' or 'CertSuite All' - by checking the relevant radio button
- Note that you can choose any one from CertSuite Installation, PAT, or Asset (they are priced differently), but you cannot choose only two - say Installation and PAT, or Installation and Asset, or Asset and PAT
- If you want to buy more than two licences you must select 'CertSuite All' - which gives you all three, at a discounted price - that's Installation + PAT + Asset together.
- You can upgrade to 'CertSuite All' from Installation, PAT or Asset at any time (see 'Upgrading', below)
- Once you have selected your licence, confirm by tapping 'Add to shopping cart' at the 'Apply Licence' box
- The new user's row changes from dark grey to white/light grey, indicating that they now have an active licence
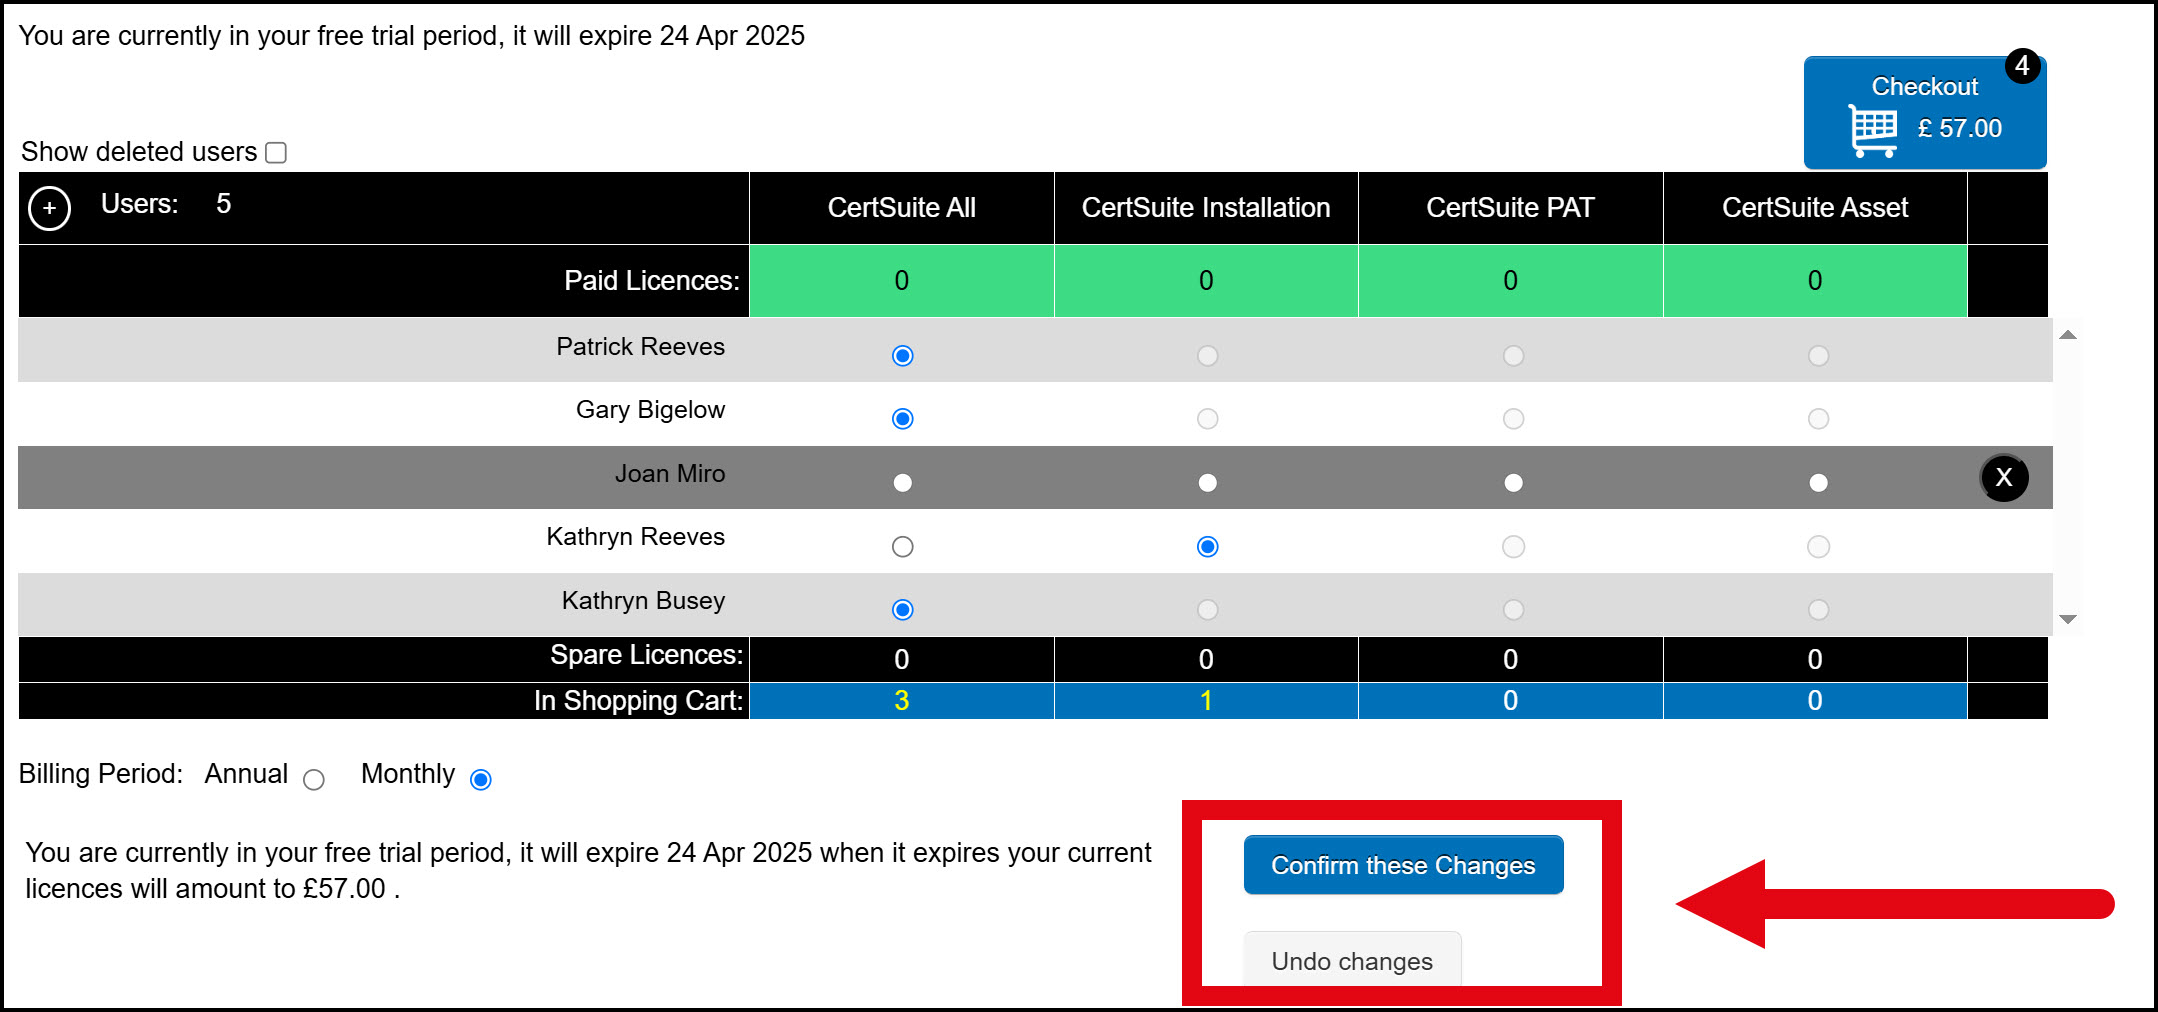
- At this point either tap 'Confirm these Changes' to proceed, or 'Undo Changes' to start again.
Payment
- If you are in the one-month Free Trial there is no charge for new licences, but the licence cost is still added to the blue 'Checkout' box (top right) and must be paid if you continue using CertSuite after the Free Trial ends
- If you are outside the Free Trial you must either have spare licences to assign to new users, or else buy additional licences through the Checkout box
- Payment can be made on a monthly, annual, or 5-yearly basis
- The monthly/annual/5-yearly cost of licences is shown at the ‘Checkout’ - tap this box to make payment
- The 'Shopping Cart' then displays, showing details of all licences and costs: to pay, tap 'Create Invoice' and then follow the next steps: details of how to make payment are in the article on 'Payment' (see link below)
Upgrading licences to ‘CertSuite All’
- To upgrade a user to ‘CertSuite All’ simply tap the relevant radio button
- At the 'Apply Licence' screen tap 'Upgrade Current Licence'
- The user now has access to 'CertSuite All' - all three products at a discounted price
- In the Free Trial, upgraded users get access to 'CertSuite All' straight away
- But outside the Free Trial the upgrade only becomes effective once the additional licence cost has been paid
Swapping licences between users: this is a great way of getting the most out of your licences, and your users. The golden rule is that you can only ever have as many active Users as you have current Licences:
- If a team member no longer needs a licence it can be given to another user - one who does not have a licence
- Start by unchecking the radio button of the user who no longer needs the licence
- The 'Remove Licence' modal appears: tap 'Yes' to confirm removing the licence from that user - whose row now turns dark grey
- Because the licence is unassigned it appears in the 'Spare Licences' row
- It can now be given to another user who has no licences: simply tap the relevant radio button of the user in question, and then tap 'Yes' at the 'Apply Licence' modal
- The licence has been successfully swapped between two users: note that it no longer appears in the 'Spare Licences' row
Saving and undoing your changes
- Click the 'Confirm these changes' box at any time to save your selections
- Or click the grey 'Undo changes' box if you change your mind
Any questions or feedback? Please contact support at: software@megger.com
[Article 01-0106-07]